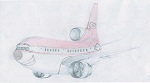
Ja das ist ne Pilatus PC-12 aber von Flight One. Gibt aber auch ne schöne Freeware Maschine von AFG >>>>
Drück mich.
Die hab ich früher immer benutzt. Das Außenmodell sieht klasse aus, und auch das VC ist gut gelungen.
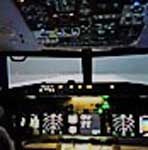
Im VC fehlen aber die Motoranzeigen, mit ein bissel Gefummel kann man das aber ausbessern. Zuerst läd man sich folgendes herunter.
>>>> PC 12 <<<<
Dann folgt man dieser Anleitung.
* AFG's Pilatus PC-12 Install Guide Help *
If you'd like to enjoy this fantastic piece of freeware in spite
of the cumbersome installation procedure, here goes a short
guide on how to install AFG's Pilatus and get it flying. I did it
this way the first time and it worked fine! Here goes:
1) Unzip and run the .exe, pointing to your correct FS location.
After install, two new folders will appear within the "\aircraft\"
folder: "AFGPC12L" and "AFGPC12S".
2) Within the "AFGPC12L\panel" folder, you'll find two .zip files
(sort the files by path in WinZip to ease the selection process).
a) From "afg_pilatus_pc12_panel.zip" install the following:
- The gauges go into your main "\gauges" folder.
- The files appearing under the folder "\panel" go
into "aircraft\AFGPC12L\panel". The rest of the
files are screenshots and documentation, which can
be unzipped wherever you want (you don't need to).
b) From "Additional files by AFG.zip":
- Gauges go into the main "\gauges" folder.
- Files under "\panel" go into "aircraft\AFGPC12L\panel"
- Files under "\panel.vc" go into "aircraft\AFGPC12L\panel.vc"
Overwrite all when asked.
That was the basic install, but it's not complete yet. If you don't fix
this, FS9 will CTD whenever you use the PC12 and exit. Let's see:
3) Edit the "aircraft.cfg" and look for the header "[propeller]".
On the last line of this groups you'll find a line that says:
rotation = -1,-1
It must read (we cancel it):
\\rotation = -1,-1
Save and exit.
4) Now, in the folder "aircraft\AFGPC12L\panel.vc", edit the file
"panel.cfg" and look for these lines:
[Vcockpit04]
Background_color=0,0,0
size_mm=32,32
visible=0
pixel_size=32,32
texture=$Fake
gauge00=exhaust!TurbineExh_pc12, 1,1,1,1
which shoud read (we are cancelling them):
//[Vcockpit04]
//Background_color=0,0,0
//size_mm=32,32
//visible=0
//pixel_size=32,32
//texture=$Fake
//gauge00=exhaust!TurbineExh_pc12, 1,1,1,1
and also replace the next:
[Vcockpit05]
with
[Vcockpit04]
(We disable vcockpit4 and make vcockpit 5 to be 4, ok?).
Save and exit.
We're almost there. The PC12 should work ok now, all the
gauges should be there, displaying the proper values. Now
the problem is that you get no digital gauges in the VC.
The 2D is really good, but if you like to fly in the VC, we
can do it too:
5) Get (from FSim or AVsim) the file "pltspc12.zip", which
is another PC12, designed by Brian Gladden. From this
.zip there's only one file we need: "PC12.gau". Install this
one file into your main"\gauges" folder and we're almost
set. The last thing to do is to open the file "panel.cfg" that
you can find in "\Aircraft\AFGPC12L\PANEL.vc".
Go to the group "[Vcockpit01]" and after the last line
add this : "gauge22=PC-12!ENG, 374,132,122,176".
Phew! That was it. You should see digital display in the VC.
Now, the only thing I couldn't figure out is why the VC looks
so blurry. If anyone figures this one out, let us know, yeah?
Another thing: I only fly the "big winglets" model, so I don't
know if this install works with the "small winglets". Try it. Smiley
Ok, good luck with your install, and I hope this guide will
help you run this fine baby and fly it! Cheers!
Sieht komplizierter aus als es ist. Und man hat danach eine wirklich schöne Maschine im Flusi.